
|
soil
type testing
 Soil type refers to the
texture of your soil. Soil's basically composed of
mineral particles, organic matter and air spaces.
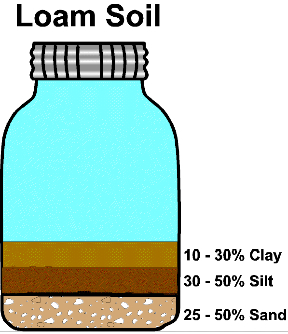
For earthbags & plaster, you'll want soil that's between about 18% and 30% clay. After you sift out the rocks & gravel in your dirt, you're left with soil. Soil minerals come in three basic categories: sand, silt and clay. Sand is the largest particle. Silt particles are smaller than fine sand but can still be seen by the human eye. Clay particles are microscopic. The relative proportion of these particles determines the soil texture.
Loam soil—the ideal
soil texture - is composed of all three categories
(sand, silt and clay). The ideal loam soil contains
40% silt, 20% clay and 40% sand (and organic matter,
if you're gardening). Loam is a separate category
because none of its components account for more than
50% of volume.
Test Soil Type by Hand You'll want to bring along a water bottle, and maybe some jars or plastic sandwich bags for samples. For the latter, also bring a magic marker & way to label your samples so you don't get confused. These are very rough tests, but allow you to narrow soils down to those that are worth subjecting to the jar test (below). TEST 1: Take a handful of soil, and pour some water on it. Feel it and rub it between your fingers. If it's rough and gritty and breaks up easily, it's predominately sandy. If it feels sticky and like plastic, it's probably mostly clayey. If it feels slippery with particles that are smaller than sand, it's mostly silty. You want something that has elements of all three. TEST 2: Squeeze the wet soil in your fist, trying to form a lump with it. If it makes a solid lump that doesn't crumble, it's got a high clay content. If it crumbles at once, it's mostly silt or sand. Rub it back & forth between your hands (like you would with Play-Doh or, duh, clay). Does it hold up & make an elastic snake that holds together? Partially? Test Soil Type by Jar This test can take several hours to a day or two.
Sand particles are the heaviest of the three and settle out of the solution after about a minute. The sand layer is coarser in texture than the silt and clay. Silt is the next heaviest particle and will settle out after about an hour. The silt layer is darker than the sand. Clay, the lightest particle in the mix, can take from one to two days to settle out of the solution. The clay layer that settles on top is fine textured and light in color. If you have any organics, they'll be floating on the water's surface. If you like, you can calculate percentages and transfer the numbers to the soil texture triangle (below, click to enlarge) to determine the composition of your soil. 1.) Measure each layer of sediment. 2.) Figure out the rough percentages of sand, silt, and clay in the sample. For example, if you have 5 total inches of soil in your jar, then every 1/2 inch will be 10%. (1"=20%, 2"=40%, 3.5"=70%, etc). If you're using centimeters, it's the same idea. Remember:
your
"ideal" soil for earthbags should fall into the "loam"
category with
approximately 20% clay, 40% silt and 40% sand.  Amending by Soil Type If a soil tends toward an excess in clay, sand or silt, you can amend it by simply adding & mixing the required components in a wheelbarrow. If you're doing much of this, do yourself a favor & invest in a mortar hoe, which is heavy-duty and has 2 large holes in the blade that makes mixing easier). Both sand and silt are pretty commonly available in most areas. If necessary, you can buy them from an aggregate yard for a few dollars per cubic yard. Clay is a little more difficult to find, if it's not common in your region. You might be able to find sources of clay-rich dirt in river bottoms, lakes and ponds. Construction sites may have cleared topsoil, leaving access to clay layers below that you might be able to get permission to harvest. You can even buy powdered clay from pottery suppliers, but this can get expensive. You don't want too much clay in your mix - it tends to expand when it's wet & contract when it's dry, causing cracking. Don't go over 30 percent. You can also use cement and/or lime to stabilize clay-poor soil. Cement-stabilized dirt will be subject to cracking & doesn't offer as good insulative properties as clay or lime. Lime is great but takes forever to dry and tends to be caustic (wear gloves). It's also best when fresh, so if you buy a bag of lime from your big-box hardware store know that it might be old. Look for a date on the bag (not always there, but worth trying). You can try try mixing a little lime with cement. Start with about 8% per volume, make a few test batches with different percentages of clay, then set them out in the sun to cure. If you have access to straw, adding a small amount to your mud also helps strengthen it (more useful for plaster than for bag fill). You'll want to chop it up small - say, 2" pieces. This can easily be done by tossing straw in a metal drum & using a weed eater to chop it up. If you're really interested, check out the Internet for articles on Roman concrete (which has lasted for 2,000 years, even underwater). It's vastly superior to anything we've developed in modern times, and still has chemists and engineers scratching their heads. The key seems to be using volcanic sand, if you have access to it. We haven't tried mixing it up yet, so if you're curious have a go at it & let us know what you come up with. Here's a good article: http://www.romanconcrete.com/docs/spillway/spillway.htm. Testing your soil If you're going to try amending your soil, get out a measuring cup and measuring spoons. There are 16 tablespoons to a cup, so 3.2 tablespoons = 20% of a cup 1.6 tablespoons = 10% of a cup 3/4 tablespoon, slightly rounded = about 5% of a cup You don't have to be that precise; just be consistent. If you're using metric measurements, 250 ml = 1.06 cups, so you can go from there. If you're trying a few different formulas - say, one with 10% cement, another with 15% cement, another with 5% cement + 10% lime, etc. then be sure to label your samples. Moisten your soil, roll it between your hands & make balls or snakes, and leave them out in the sun (or put them in a 150-200 degree oven) to dry & harden. Once they're fully hardened, try these to see if you have earthbag-worthy fill: 1.) For snakes or cylinders, try breaking them in half. Study what happens. Do they crumble? Do you get a clean break? How hard is it to snap them in half? 2,) The drop test. See what happens when your dried ball sample when it hits the ground from chest height. Do it on soft ground, grass or carpeting. If it shatters, you have too much sand. Cracking in half is better. No cracking is best. 3.) The nail test. Try to gently (gently!) tap a small nail into your fully-cured sample. If you can without it splintering or breaking apart, you've got gold. Remember
that a good soil mix can serve both as both bag
fill and as a base plaster.
The following is geared
more towards gardening, but might help with gaining a
comprehensive sense of the three components &
their qualities:
Credits:
http://www.your-healthy-gardens.com/soil.html,
http://www.rain.org/global-garden/soil-types-and-testing.html
|

